Pages

Tuesday, December 31, 2013

Using printables on your layouts

Good morning everyone!  On today's layout I used printables and scrapbook supplies from Paper Bakery's December Scrapbook Kit.  I wanted to share how easy (and fabulous!) it is to use printables on your pages.  And I love that if I mess up (oh no!) or want to use them again, I can just reprint them!  You get printables every month as a subscriber to any of Paper Bakery's kits (cards, scrapbook, mixed media, etc).  I have loved all of Paper Bakery's kits that I have used, but I think the December kit is my favorite- it is full of color and very versatile!


See how I used the large journaling card -- since I find my handwriting pretty terrible, I typed (in Photoshop) my journaling onto the printable journaling card before I printed it out.  I really liked the way this turned out and I think I will start doing this more often!
 
And I really adore this starburst stencil that is included as well!  I simply dabbed a thin layer of white paint over it and blotted it to tone the white down a bit.  I can't wait to use this stencil on more projects!  And check out the fun flair that is exclusive to this kit!

 
 Yes, I would agree-  life is beautiful!

 Thanks so much for stopping in today!  I hope I have given some of you courage to use those printables!   You can see more of Paper Bakery's December Scrapbook kit here!
Or to make sure you get the printables each month, you can check out the subscriptions here!
Hugs,  Tegan


Sunday, December 29, 2013

Using ombre background paper

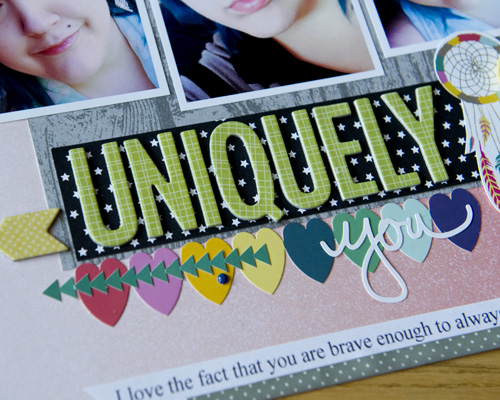
Good day all!  Today I am sharing how I used an ombre background paper on this layout.  I used a combination of the Paper Bakery September Scrapbook Kit and the September Project Kit.  I love these artsy selfies my youngest sister took of herself and these artsy kits were perfect for these photos!  And the ombre background added an artistic flair to the layout!  These September kits were jam-packed with color and oh-so-very-cool!


And my favorite part- the close ups!
I used the arrow cut file from the September kits as well!  I love that the kit subscriptions include these cut files to be used over and over again!
 
 
And the title just might be my favorite part!  I love the look of the big bold alphas against the black background!
 
Thanks to everyone to stopping in!  Hope you had a great weekend and I hope you have a great Monday!
Hugs, Tegan


Friday, December 20, 2013

Christmas Memories Layout

Good day everyone!  Today I am sharing a fun family layout I made about hanging out with the family during the holidays.   I used the very festive Paper Bakery Holiday Charm Scrapbook kit and it is very charming indeed!  I love the colors and the fact that it's not completely filled with Christmas goodies- it includes cute general goodies as well!  I trimmed the fun numbers from one of Pink Paislee's Hey Kid papers.
 
 
You also get a handful of fun cut files to use over and over again when you buy this kit!  Check out this handwritten "Merry"!  Isn't it just great!?!  I love it as part of my title!  The little star is an included cut file as well!  The adorable (sigh!) wood grain stars are made by Pretty Little Studio and yep, they are included in the kit as well!


One of my favorite things in this kit is the package of Heidi Swapp's epoxy holiday words!  Love, love, love!!  Everyone needs these!   They are just so cool!
 
 
Thanks so much for finding a little time to stop in during this crazy holiday season!  I hope you have a great day! 
Hugs, Tegan 


Wednesday, December 18, 2013

Believe Christmas Card

Hello!  I hope everyone is all set for the holidays!  Today I am sharing a little card I created using Paper Bakery's November Scrapbook Kit Holiday Charm!  The kit is great- it does include some Christmas items but a lot of general items as well!  I really enjoyed working with this fun and charming kit!   For this card I used the "believe" cut file from the kit as the main sentiment- I just cut it out once in teal and then cut it out a second time (same size) and layered the black underneath it.  I also used one of my new favorite patterned papers- the black handwritten words paper from Heidi Swapp.

I hand cut the red and white circle from Pink Paislee patterned paper and hand cut the 3 snowflakes from a Teresa Collins paper that was included in the kit too! 

Thanks for stopping in everyone- I know you are getting busy with Christmas right around the corner! 
Hugs, Tegan

Thursday, December 12, 2013

Decorating for Christmas layout

Good day everyone! Today I am sharing a festive layout I actually made about myself!  It was nice for once as I am usually always behind the camera!  I documented a few fun things I did while decorating our home for the holidays!  Those fun things include lighting my favorite candle (Bath & Body Works Twisted Peppermint!), playing my new favorite Christmas CD (Wrapped in Red by Kelly Clarkson!), and wearing my favorite candy cane striped socks! 
 
I used the very festive Holiday Charm Scrapbook kit from the Paper Bakery and I loved every second of working with this charming kit!  AND I absolutely love this map patterned paper!
 
 
And some close ups!  I just adore the wooden snowflake tag that was included in the kit as well!  I just added a few alphabet stickers and a word epoxy so as to not completely cover up the cute snowflakes.
 
And of course I had to use two of the Heidi Swapp epoxy words on my layout!  I just love them to bits!  I think everyone needs to own a pack (or two!). 
 
Thanks for stopping in!  I appreciate it!  I hope you can find some time in this busy season to scrap a page about yourself as well.  Us scrapbookers need to be in the spotlight once in awhile too!
Have a great day everyone!
Hugs, Tegan


Tuesday, December 10, 2013

Cards and cut files!

Good day everyone!  Today I am super excited to share with you my latest trio of cards I made using the eclectic and awesome Wildflower collection by Carta Bella!!  I love all of the colors, patterns, and prints! Be still my heart! I thought the best way to show off this nifty collection was to use 3 different cut files to make cards!  I simply used the journaling cards, element stickers, and a little jute to add the finishing touches to them!
 
 
And a few close ups!  Can you find the cute hummingbird sticker?


And even one for the hubby!
 
I used the striped frame cut file, the sunburst mat stencil, and one of the slanted tiles cut files from the Silhouette store.  These cards were very easy to make with the Wildflower collection!  I hope you find some time to give these cut files and the Wildflower collection a try! Have a great day!
Hugs, Tegan


Sunday, December 1, 2013

A Merry Christmas layout

Good morning!!  Is most everyone getting ready for Christmas?   I know I am in full Christmas mode now!    
 I love the red and green color combination so I am thoroughly pleased with the Paper Bakery's November Scrapbook Kit called Holiday Charm!  Here is just one layout I made with the kit!  Last year my sis and I tried making Christmas cake pops for the very first time and those pictures were perfect for this!
 
 
I am just smitten with these Heidi Swapp epoxy words that came in the kit-- They are fun, fast, and oh-so-awesome!  I may have bought another package of these! ;)
 
 
Thanks for stopping in everyone!  I hope I have inspired you to create your own holiday layout and not just made you hungry for cake pops!  :)
Hugs, Tegan


Monday, November 25, 2013

Christmas home decor house

Good morning everyone!  Today I am thrilled to be sharing my latest Christmas project in which I used the fabulous Carta Bella line So This is Christmas!   I love that this line features the traditional Christmas colors but also has a small bit of light blue.  This collection is great because it will match almost everyone's traditional Christmas decorations.  I used my Silhouette machine and the 2 story ledge house cut file to make this project.  I love how it turned out!

Do you eye-spy Santa Claus?

And every Christmas house needs a Christmas tree right?

I hope you have enjoyed my little Christmas house!! I love this cut file too because it makes the house very thin- which is great for a window ledge or thin fireplace mantel.  I hope to add more houses to make a matching village before Christmas!   Thanks for stopping in!
Have a great day!
Tegan


Monday, November 18, 2013

A Christmas card

Good morning everyone!  Today I am happy to share my latest Christmas card using Carta Bella's "So This is Christmas" collection.  I just love this collection!  I love the traditional deep red and green Christmas colors and the little splash of light blue thrown in!  Their little chipboard ornaments worked great for the dangling ornament design I made on the card.


And a close up!
 
Thanks for stopping in everyone!  Carta Bella's "So This is Christmas" isn't just great for Christmas cards- it's great for projects too!  I can't wait to show you all my home décor piece next week!
Have a great day and hugs!
Tegan


Monday, November 11, 2013

A layout about myself

Good day everyone!  Today I am sharing a layout I made using the Paper Bakery's October Scrapbook kit called Pumpkin Latte.  The colors in this kit are just gorgeous- totally reminiscent of fall!!  No wonder I love it!    I also based my layout on a fabulous sketch by Juliana Michaels...

And my take on the sketch!   The latte stamps that are included in the kit were PERFECT for documenting my love for pumpkin spice lattes!!   They are also great for cards and fall layouts in general!  


I used my favorite printable from this month’s kit to replace the large picture at the bottom of the sketch.  I guess you could say I turned it into a billboard for lattes!
 
I love love love the gold rub-ons that were in the kit as well!
 
Well, thanks for stopping in!  I hope I have inspired you to create a layout about yourself for once!  Have a great day!
Hugs, Tegan


Thursday, October 31, 2013

A Happy Haunting Halloween layout!

Good morning everyone!  Happy Halloween!  I am excited to share today's layout because I love Halloween and the orange and black color combo associated with it!  I wanted to share just how easy it is to get a lot of those pumpkin carving pictures on one layout!  I used Carta Bella's awesome Halloween collection called Happy Haunting!    I staggered the photos to give the layout some movement and I let the completed jack-lantern picture be my focal point.


And every blog post needs close ups!  I love the rusty orange and faded black of this collection!
 
This is my favorite part!   I took a gold Sharpie marker and drew in a few sets of eyes in the trees of the background paper!
 
Thanks for stopping in today everyone!  Hope you have a great day!
Hugs, Tegan


Tuesday, October 29, 2013

Guest Blog Post for Shimelle!

Good day everyone!  I am over the moon excited to announce that I have a guest post on Shimelle's blog today!  It includes something new and wonderful you can do with border punches and washi tape!  If you are anything like me, you have an endless supply of decorative tapes!  I wanted to come up with a new way to use up my decorative tape stash... you know, so I can buy more!  *wink wink*
 
 Here is a sneak peek!  You have to head on over to Shimelle's blog for all of the details...
 
 I sure would appreciate it if you took a quick minute to hop on over to Shimelle's blog and let me know what you think!  Thanks and enjoy your day!
Hugs, Tegan
 

Monday, October 14, 2013

Halloween Home Decor!

Good morning!  I am happy to be sharing my latest project with you.  I just love Halloween so I was excited when I first saw Carta Bella's Happy Haunting collection!  Not only is it perfect for altered projects, but cards and layouts as well!    For this project, I started with a round paper mache box I picked up at my local craft store.  And I love crows this time of year, so I incorporated one of those as well.  I found the crow at my local Dollar Store, but I have seen them at the craft store as well.
 
 This project is pretty easy to create for anyone who wants to give it a try!  I first traced the paper mache box onto patterned paper, cut out the pieces, and adhered the papers to the box.  I used liquid adhesive and placed rubber bands around the box until the adhesive was completely dry.  I then trimmed pieces from the Border Strips paper to further decorate the box.  To create my label, I layered pieces from the Element Stickers with foam adhesive.
 

To make the hat for Mr. Crow, I traced a large button I had, cut a slit to the middle, and overlapped the cut edges to make a cone shape.  Once it was small enough, I adhered the ends in place and then cut a small hole out of the very top.  I cut a few small pieces of twine and stuck them though the top of the hat and adhered them in place.  For Mr. Crow's collar, I simply trimmed a long piece of paper about 3/4" inch wide and accordion pleated the entire piece. I then adhered the ends together and adhered the collar to Mr. Crow.   Pretty easy!  Thanks for joining me today!  I hope I have inspired you to create your own Happy Haunting creation!
 

Supplies
Carta Bella's Happy Haunting: Haunting Hexagon, Scary Skulls, Border Strips, Spooky Stripes, Full Moon, Element Stickers
Other: Paper mache box, decorative crow, foam adhesive, twine

Thursday, September 26, 2013

Fun with a splatter stamp layout!

Good day everyone!  Today I am excited to share my latest layout with you!  I am showing how to take a splatter stamp and make it look like wet marks on your layout.  To start, I used a combination of the FABULOUS September Paper Bakery Scrapbook kit and the Project kit and the cardstock add-on.  I LOVE the cardstock add-on!  It makes matching cardstock to the kits a breeze!

 
To get the wet splatter effect, I used the Paper Bakery's exclusive new member splatter stamp.
 
I started with the aqua cardstock from the add-on, and I used ink that was similar to the cardstock color...  Here I used Hero Arts Soft Pool ink.
 
The kit also comes with some great die cut files as well... Isn't this arrow awesome?

 
Thanks for stopping in today!  Hope you have a great day!
Hugs, Tegan


Tuesday, September 10, 2013

Winner Winner!!

Hi everyone!   As promised, I have picked the winner of the Carta Bella collection kit!!  I did it the old school way- I wrote everyone's name down on a piece of paper, folded them up, and put them in a cereal bowl.  And the winner is............    Izzy Anderson!!   Thanks again, though, to all those who left such kind comments!  Have a great day!
 
~Tegan

Friday, September 6, 2013

Carta Bella Tic Tac Toe!

Hello!  Today I am sharing a fun and unique twist on a popular kid's game!  The  very colorful Rough & Tumble collection by Carta Bella works perfectly for not only layouts, but projects like this tic-tac-toe game.   I absolutely love the color palette of this collection- blues, reds, gold, and aqua.  It is perfect for boys of all ages!
 

The stickers and chipboard elements made decorating the game board a breeze.
 
Carta Bella offers a digital version of this collection and recreating this project with the digital elements would be easy as well! It's just a matter of layering the elements.   I would love to make digital multiples of this game, print them, and hand them out at my nephew's birthday party!  The kids would love these!
 
I used the helicopter and sailboat elements from the patterned papers to create my game pieces.  Helicopters for the circles and sailboats for the squares.  This is not your ordinary tic-tac-toe game!   The chipboard stickers are great to add dimension to the project.  The only problem now is deciding who gets to be sailboats and who gets to be the helicopters!


 Here are instructions to make your very own tic-tac-toe game using Carta Bella's Rough & Tumble:

1.  Cut a piece of cardboard or chipboard 8 1/2"x11" and cover with "Vroom Vroom" patterned paper.  Add a 7 1/2" square of "Playful Plaid" patterned paper in the middle of the playing board and then layer a 7" square of "Silly Squares" in the middle of that.

2.  Cut strips of the solid gold from the "Adventure" patterned paper 6" long and adhere them to make the tic-tac-toe grid.

3. Embellish the game board with stickers from the "Elements Stickers" and the "Chipboard Stickers".

4. Punch circles of helicopters out of the "Soaring Planes" patterned paper and layer over larger punched circles of solid blue from the "Playful Plaid" paper.

5. Punch squares of sailboats out of the "Floating Boats" patterned paper and layer over larger punched squares of solid teal from the "Floating Boats" patterned paper.    

Supplies

Rough & Tumble :  Soaring Planes, Vroom Vroom,  Floating Boats, Silly Stripes, Explore Together, Playful Plaid, Adventure, Element Stickers, Chipboard Stickers

Other: Cardboard or chipboard, 2 sizes of circle punches, 2 sizes of square punches
 
Thanks for stopping in!  Hope you have a wonderful day!
Hugs, Tegan


Thursday, September 5, 2013

My first Carta Bella project!

Good morning everyone!  Today I am excited to be sharing my first official project as a Carta Bella design team member!   I am thrilled to be working with their fabulous products!   I used their newly released Rough & Tumble collection to make my card... I love the little cars and the colors are perfect for boys of all ages!


This card was easy to put together using their element stickers, chipboard stickers, and layered stickers!
 
 
 Aren't these little cars not the cutest?!? 
 
 
Anyone that has boys will surely love this line!  But it also has lots of general patterns that can be used on anything!  I love the mix of reds, blues, golds, and aquas in this collection!
 
 
AND NOW FOR A GIVEAWAY!!!
Want to win a collection kit of your choosing from Carta Bella Paper? Simply leave your name and email address (in code if you prefer) in the comments section of this blog post to qualify. All comments are due by September 9th at 11:59 pm CST to qualify. I will select ONE lucky winner on September 10th and notify them by email. Winners have one week to respond or I will select another winner. The winner may select a current collection from Carta Bella Paper. The collection will be shipped from the Carta Bella Paper offices. Only one entry per person please.
 
Good luck to everyone and thanks for stopping in today!  Have a fabulous Thursday!
 
Hugs, Tegan


Wednesday, September 4, 2013

A layout about love

Good day everyone!  Today I am excited to share my most recent layout using Paper Bakery's August Kit Hello You!  The kit is fabulous--  I love the colors and the fact that it includes some of Carta Bella's gorgeous Hello Again papers!!!   And I can't forget the fun enamel dots and Jillibean Soup's awesome Alphabean letter stickers, which are my absolute favorite alphas!


I also used a part of Paper Bakery's cardstock add-on, which is great because they match wonderfully.  I love the mouse gray that I used here.
 
 
And the best part- the close ups!  I did add my own embroidery floss only because I wanted to do something "different" with my circles.
 
And this 100% loved stamp is simply adorable!    It is part of the pie chart stamps.  And the falir is exclusive to the August kit!
 
 
As ALWAYS, thanks for stopping by... I really appreciate it!  Have a great day!
 
Hugs, Tegan


Wednesday, August 28, 2013

Quick and easy card

Good morning everyone!  Today is all about quick and easy!  I used the fabulous August Hello You kit by Paper Bakery and a bit of the cardstock add on.  I love that Paper Bakery has started to offer cardstock because I love cardstock and the colors go great with the main kits!


 I used the Jillibean alphas that are included (love these!)  And the striped enamel dots add just a touch of whimsy!


I love this add-on stamp too!  It is part of the pie chart stamp.  And the stamps are very easy to use and stamp really well!

If you would like more information about these cool products, hop on over to here!  Thanks for dropping in today!  Hope you all are staying cool in this heat wave! 
~Tegan