Tuesday, December 30, 2014

Countdown 2 Christmas part 2!

Yes, I know that Christmas is over, but part of me doesn't want to let it go! I am sharing this second Countdown 2 Christmas spread for those out there that are still wrapping up their December mini albums. This pocket page spread features Pink Paislee's festive Merry & Bright collection, which I love! You just can't beat the traditional red and green colors with a trendy pop of black- just perfect! Here I documented my new favorite mugs that I had picked up at WalMart this year!
 
On this layout, I filled the left two pocket pages with red patterned paper and adhered my journaling banner over the top of the page using Zip Dry liquid adhesive. 
 
I love how easy the 4 x 4 journaling cards are to make a cool Countdown 2 Christmas album! Here I picked the black and white striped one for my day 19. I then added a glittered die cut from the ephemera pack - and instant Christmas cuteness!
 
The black glittered word stickers are one of my favorite embellishments from this collection. Notice here I used it as the very last word of my journaling. Yes, hot chocolate is pure...JOY!
 
 
Just a close up of my new favorite mugs and me by the tree!
 
I finished off this second page with adorable patterned paper, a glittered die cut ephemera piece, and some metallic number stickers! And then I topped it off with a cute matching fabric bow from the collection!
 
If you need lots of inspiration to get that December pocket page album complete, head over to the Pink Paislee blog for all 25 days of their Countdown 2 Christmas featuring the Merry & Bright collection!
Have a great day!
~Tegan
 

Sunday, December 28, 2014

Countdown 2 Christmas!

Do you sometimes feel like the holiday season is a runaway train and you end up finishing your December mini album afterwards?  I sure do! And if you're in the same boat, this post is perfect for you! I am sharing my Countdown 2 Christmas spread featuring the cool and festive Pink Paislee Merry & Bright collection!  For my first spread (Day 1), I documented my favorite decorations and decorating the tree. I used the Pink Paislee 8 x 8 mini album that features the awesome silver sequin star on the cover. Oh the possibilities!  Here I embellished my cover with bits from the ephemera pack and the metallic numbers!
 
 
The Merry & Bright collection made putting my album together so easy! The colors are classic, yet trendy so they match almost any holiday photo! 
 
I had fun photographing my favorite Christmas decoration, this elf I got from Michael's a couple years back.  See how perfectly Merry & Bright matches my photos?!
 
The 4 x 4 Countdown Cards are so easy and so perfect for a Countdown to Christmas album! I simply added a couple ephemera bits and a couple of gems - and instant Christmas cuteness!
 
I love the addition of black to this collection!
 
And I am so happy that Pink Paislee included some awesome canvas pages in the album as well! I loved making this mini layout for my album!
 
Showing off the sweet bow, metallic number sticker, and glittered snowflake ephemera bit!  All from the Merry & Bright collection! Did I mention I seriously love this page?!?
 
I just can not get enough of the black glittered word stickers!  Fabulous Fabulous Fabulous!
 
Thanks for joining me today!  I hope I have inspired you to finish up that Countdown 2 Christmas album!  And if you already have it done, I tip my hat to you! Well done! 
Have a great day!
Tegan  :)


Friday, December 19, 2014

Warm & Cozy!

Is everyone staying warm out there? Our weather here seems to have taken an arctic turn!  But I guess that is OK, because I need to get some more cold weather photos!  Carta Bella's Warm & Cozy is perfect for documenting winter activities or just a fun little snowy shot like I show here!  I love Warm & Cozy's rustic and fair isle tone. And I am so  in love with this tweed looking patterned paper that I just had to use it as my background!
 
 
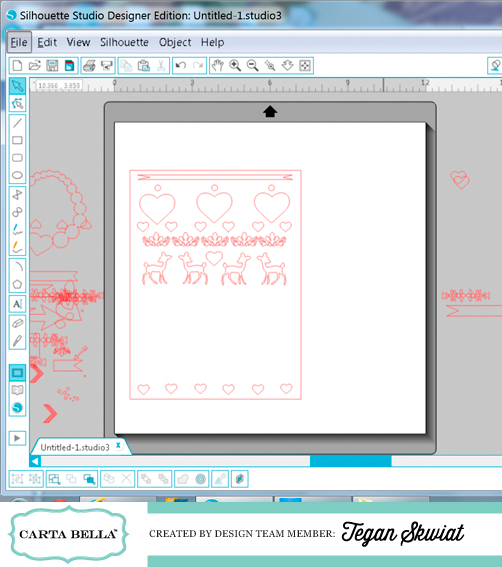
The collection reminded me of a fair isle sweater, so I wanted to recreate the look on my layout! I immediately pulled a handful of Carta Bella Silhouette cut files to use and I love the way it turned out! I used the deer of course, the heart part of the necklacea damask, and a banner. I love that this layout reminds me of a cozy sweater!  Don't you love this wintery plaid?
 
 
I thought it would be easiest to cut my pattern out of cream cardstock and back the openings with different patterned papers.  I decided what size I wanted my cream cardstock piece to be and designed my pattern.  
 
 
Once I thought I had made a great fair isle pattern, I took the grid off so I could see exactly how it would look once cut.  It did take me a few tries of moving sections up and down and back and forth. But at last, we have a winner!!!
 
Be sure to grab some of Carta Bella's Warm & Cozy for your cold weather photos!
Thanks for stopping in today - I appreciate it!
Tegan


Thursday, November 13, 2014

A Perfect Autumn!

Today I am sharing a layout that features the oh-so-perfect-for-fall collection by Carta Bella called A Perfect Autumn! As you can see, the color palette of this collection was perfect for my fall photo. And the colors are beautifully rich in person too!  I am loving the mix of burgundy, gold, green, and orange- all of the colors you see in nature in the fall! And who can resist that little deer? 
 
I used the "Autumn" and little leaf dies from the Carta Bella Designer Dies Autumn Frames die set as embellishments along my page.  The die cuts are very cute themselves, but they really pop with the addition of a little embroidery floss stitching don't you think? The little owls in the collection are super cute too!
 
Yes, it was a perfect fall day! I added some cute chipboard pieces, brads, and stickers from the collection to finish off the top of my page. Did you notice the one little brown stitched leaf die cut? Cute right?
 
Thanks for stopping in today! I hope I have inspired you to add a little bit of A Perfect Autumn to your scrapbook collection!
 
Tegan
 

Tuesday, November 4, 2014

Merry & Bright December Days!

Who is gearing up for Christmas? I am and I am pretty excited about the holidays! And I was fortunate to be able to guest design for Paper Camellia using their FABULOUS December Days kit! I started with a layout and some gift card holders, but I still have plenty of supplies left for a few more projects! And I can't wait to get started on those.  I love that the December Days kit contains LOTS of Pink Paislee's super cool Merry & Bright collection. If you like traditional holiday colors, then this December Days kit is for you! On my layout, I clustered lots of the Merry & Bright ephemera pieces around my title.
 
Don't you just love the slightly modern twist that the apple green from Merry & Bright adds?
 
 
I used my Sizzix mitten die to create these fun gift card holders too! I love that the Merry & Bright ephemera pack contains so many pieces- and they are perfect for cards and gifts! The December Days kit includes many fun pieces that I used on my gifts- including flair buttons, chipboard pieces, and festive twine! Be sure to check out this fabulously festive kit!
 
Be sure to check out the Paper Camellia December Days kit!  It will insure that all of your December Days are Merry & Bright!
 
Thanks for stopping in everyone! Have a great day!


Saturday, October 25, 2014

Hello Sunshine!

Hello!  Today I am sharing one of my favorite new layouts featuring Pink Paislee's fabulous Hello Sunshine collection!  It is perfect to use to document anything that makes you happy!  My little pooch Tinkerbell (nickname  "Tink") is definitely a source of happiness around the house.  How can you not be happy when your pooch greets you so excitedly every time you come home?!
 
I started by putting my photo above the "You Make Me Happy" sentiment that is printed on the background paper.  I then built my design from there.  I first laid out my paper pieces and moved them around until they fit perfectly.
 
I simply used multiple patterns of paper trimmed into long rectangles to build the graphic design on my page!  Easy but oh-so-cool.  And I just love how the beautiful patterns from this collection pop against the black background! And I can not get enough of the ephemera bits!  Swoon!
 
Here I took the Pink Paislee Switchboard chipboard alphas and punched holes in them to give them a cool new artistic look!
 
Thanks for stopping in today!  Be sure to check out Pink Paislee's Hello Sunshine collection to document everything that makes you happy! 
Have a great day!
 
~Tegan 


Tuesday, October 14, 2014

Create magazine October edition!

Hello everyone!   I am excited to share that the brand new edition of Scrapbook Generation's Create magazine is out and it is fabulous!  Not only is it fabulous, but it is also FREE so definitely be sure to check it out!   The magazine is filled to the brim with inspiration and neat projects! 
Have you ever wanted to get to know the people behind the Carta Bella Paper brand?  The magazine includes a fun and interesting article on them!  AND there are tons of great Carta Bella Paper projects in the magazine too!  You won't want to miss this one! 

 
You can find the magazine HERE.  Just go to the Magazine tab and the October edition is at the top.  And feel free to check out the rest of the Create magazines while you are there!  Thanks for stopping in and have a great day all!  
 
Tegan 

Tuesday, August 19, 2014

Halloween cards using die cuts!

 
Hello!  Today I've got some fun cards using the awesome brand new Halloween line called Spooky and the coordinating die set.  Can I just say that I am in love with this Halloween collection AND the tree and bat dies?!  I love Halloween already, but I seriously can not wait to pull out my Carta Bella Spooky supplies again!   And if you love the usual orange and black for Halloween, this collection is for you!  You have to see the rich orange color in person- I love it!
For my tree embellishments on the cards here, I die cut one tree from black cardstock and one tree from kraft cardstock.  For some fun added texture, I embossed the die cut kraft tree with a wood texture embossing folder.  I love the way that it turned out!   I then adhered the kraft tree onto the black tree so that a little of the black was visible on the left side- almost like a spooky shadow effect!
 
 
These little bats are fabulous too!  I gave them little white eyes with a white gel pen and I folded their wings up like they are flying!  I seriously couldn't stop making these cute little bats!
 
 
I also think this tree makes a great branch.  I simply just trimmed a little bit off the trunk and rotated it sideways.  Doesn't it look like the bats are flying right off of the branch? 
 
And here is a close up of what my tree and bats look like! I adhered them with foam adhesive so they would "pop" off of the cards.  I just love the texture that the wood grain embossing adds to this tree die!  And I love these spooky (and sweet!) little bats! 
Thanks for joining me today!  I hope I have inspired you again to get creative with your die cuts! 


Tuesday, August 12, 2014

Fun at the Fair!

Good day everyone!  Today I am sharing a fun layout about our trip a couple years back to the county fair.  We love going to the fair every year!  It's nice just to walk around and enjoy the nice weather snacking on an ear of sweet corn and playing fair games!  Pink Paislee's Solstice collection was a perfect match for my photos!  Be sure to check out this collection if you haven't already- it is pretty awesome!  And great for all kinds of summer photos!
 
The ice cream cone ephemera piece was a perfect match for my fair page!  And I just adore the teal glittered alphabet stickers that coordinate with this collection as well!
 
The die cut numbers from the ephemera pack reminded me of carnival games and I just had to use them on this layout!  In between the numbers, I used dots from the Gold Foam Stickers.
 
The 3d Formed Gold Stickers in the Solstice collection are amazing too!  I accented the "Summer" sticker with puffy stickers and more ephemera pieces.  I seriously can't get enough of the ephemera pack.  It is full of great images!
 
And a tip before I go!  I use the clear packaging to make sure my titles will be the correct size on my page.  Turns out the teal glittered alpha stickers from the Solstice collection were the perfect size too!
 
Thanks for joining me today!  I hope I have inspired you to get scrapping those summer photos! And be sure to check out Solstice!  Have a great day!
Tegan  :)


Friday, July 18, 2014

Scrapping large photos!

Good day everyone!  Today I am showing off Pink Paislee's fabulous Solstice collection!  The Solstice collection is perfect for all of your summertime photos no matter how small- or large- they are!   On this layout I took a single photo of our city’s lighthouse at sunset and made it the dominant image on the page.   I completed the layout with pieces from the fabulous Solstice collection and I love the way it turned out!  To get a FREE downloadable instruction sheet on how to make this layout, hop on over to the Pink Paislee blog!
 
To get this fun look, I started with the Kauai patterned paper. I used the front side with the cool design.
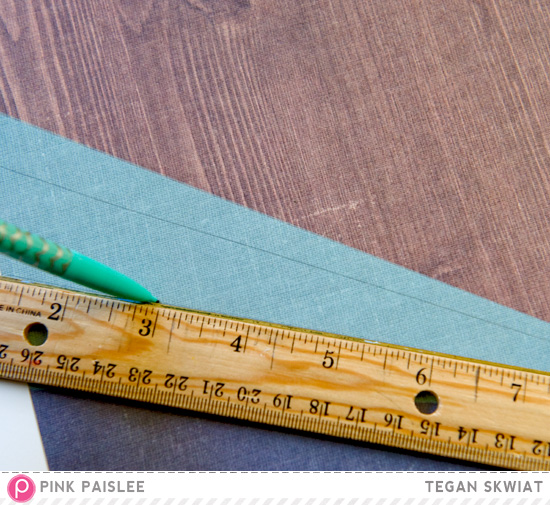
I trimmed the star burst design from the paper  and added more panels of patterned paper to it.  To do this,  I simply used my ruler and a pencil to make lines of where I wanted to insert the panels.
I then carefully hand trimmed out sections and backed those sections with my favorite patterned papers from the Solstice collection!   I now have a detailed  star burst design!   For added texture, I machine stitched over the star burst design.
 
I finished the star burst design off with some lovely ephemera bits, gold foam shapes, and puffy stickers!  I just adore the look that the gold pieces add to this collection.
 
The teal glitter on some of the ephemera pieces and the glitter alphabet from this collection make my heart go pitter patter!  It seriously is the perfect shade of teal!  And who doesn’t love glittered seahorses?
 
Thanks for stopping in! And don't forget to download the FREE instruction sheet for this layout right HERE!  Have a great day everyone!
 
Hugs, Tegan


Monday, July 14, 2014

Boy Oh Boy!

Good day everyone!  Carta Bella's Boy Oh Boy collection quickly grabbed my attention with it's color palette of red, aqua, and gold. It really is a fabulous collection for all things boy!  And I think it has a slightly vintage feel to it, so on this layout I used vintage pictures of my hubby's 4th birthday.  I quickly realized that this Boy Oh Boy collection is perfect for vintage photos too!
 
I used the patterned papers and embroidery floss to make a simple design element on the left hand side of the page. I like that the embroidery floss adds a little bit of texture.
1.  Adhere the paper strips into place.
2.  Use a ruler to lightly make X marks where you would like the stitches.  I used the pencil to mark my spots so I could move them if I wanted before I permanently poked my holes.
3.  Poke holes at the end of your X marks.
4.  Use 2 different colors of embroidery floss to stitch X marks across your paper strips.  So easy and so fun!
 
The title here is my favorite part of the layout.  First off, the banner portion (BOY OH) is from the packaging insert in the collection kit.  Yes you read that correctly!  I loved that banner piece so much I trimmed it from the Boy Oh Boy title on the packaging!  For the second half (BIRTHDAY BOY) I used the Carta Bella Happy Birthday die cut from the Silhouette store.  I simply had my machine re-cut the "B" and "Y".  And the circle star sticker was perfect for an "O", don't you think?
Thanks for stopping in today!
Hugs and happy scrapping everyone!
Tegan


Friday, July 4, 2014

Happy 4th of July!!


Hello!  Today I am sharing a fun patriotic themed layout made with the nautical themed Ahoy There collection by Carta Bella.  The color palette of this seaworthy collection was also perfect for pictures I had taken of my pooch on the Fourth of July!  I pulled out the more neutral pieces of the collection, but still included the rope patterned paper and the compass elements.  I also had a little fun with my electric die cut machine AND my manual die cut machine.   I used parts cut from Carta Bella's sail boat die for decorative elements on my page.  I used the top flag, the mast, and the hull...Can you find them? 
 
I used the sail boat from the coordinating Designer Dies to cut out four sets of sail boats from navy paper.  I then had many parts to work with and build designs from on my project.  And it only took four cuts!  I used a few of the small top flags to embellish a little empty space I had above the banner.  I love the size of these!  
 
I then used the parts of the hull as scalloped banners on the bottom of the page.  These remind me of the patriotic buntings that I see on my neighbor's porch leading up to the Fourth of July!  I then turned the masts sideways and used them as an extra decorative element right above the scallops.  I love that this one little die will not only make an adorable sail boat, but decorative page elements as well! 
 
I also used my Silhouette machine and this awesome Carta Bella Banner (Silhouette store - die cut #34522)  to add some patriotic pizzazz to my title.  I can see myself using this banner over and over again.  It would be great for cards, mini album covers, and birthday parties as well- just to name a few!
 
Thanks for joining me today!  I hope I have inspired you to think a little outside of the box.  I know for me it can sometimes be difficult to do.  I sometimes get in a rut myself.  But it can be fun to explore the not-so-obvious with your scrapping supplies!  So go ahead and be brave!  Use that nautical themed collection on a Fourth of July layout. And take that die cut shape and turn it into something completely different.   You might just surprise yourself!
Ahoy There collection:  Full Steam Ahead, World Traveler, Ship Flags, My Anchor, Good Times, Anchors Away, Sticker Elements, Designer Dies (ship)
Also: Carta Bella die cut image: banner ID#34522
Other:  White cardstock, red cardstock, electric die cut machine, manual die cut machine, sewing machine