Friday, February 21, 2014

Love inspired post!

Good day everyone!  Today I am sharing some projects I made using the awesome January Paper Bakery Scrapbook Kit called Love Potion #9!   You will definitely enjoy it as much as I did... and I like the fact that it included some love inspired pieces for Valentine's Day, but wasn't over the top on love! Here are the 2 tags I made... I just LOVE the October Afternoon grey striped chipboard alphas that are included in the kit.  My new fav!

And I also made a love inspired layout about my sweetie and I! 

To make my page border I used the sequins and arrow stamp from the Paper Bakery shop as well!
Did you notice at the top of the page I used the packaging from the My Mind's Eye Ephemera pack? You get a ton of pieces in the ephemera pack and they are all so cool!


Be sure to check out Love Potion #9!  As always, thanks for dropping in!
Have a great day everyone!
Hugs, Tegan


Monday, February 17, 2014

In the Mood: Beautiful Pastels!

Hi everyone!  Today I am sharing some projects I made using Pink Paislee's latest mood board!  It seems like mood boards are all the rage now and I can definitely see why!  I loved using it to make these next 2 cards.  I am looking forward to more of Pink Paislee's mood boards because I am sure they will coordinate with my favorite Pink Paislee collections!  Their current mood board reminded me of a spring gala and had me reaching for their beautiful  Color Wash and Sentiment Series collections!  Take a look!
 
This somewhat party themed board had me thinking prize ribbons, so I used the amazing Pink Paislee prize ribbon cut file.


The speckled eggs had me thinking I needed to add little dots to the prize ribbons too!  The banners at the top of the mood board made me want to use the Color Wash vellum boarders!
 
 
And if you're wondering how to get the pleated look like the one I used on my backgrounds here, please head on over to my official post on the Pink Paislee blog!
As always, thanks for dropping in.  It really means a lot to me!
Have a fabulous day!
Hugs, Tegan 


Thursday, February 13, 2014

Easy Birthday Cards!


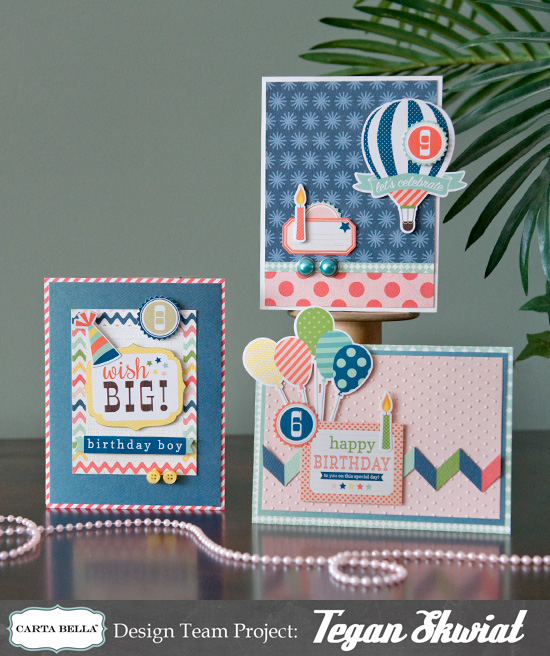
Hello!   I am excited to be sharing my trio of cards with you today! I just loved Carta Bella's  It's a Celebration collection when I first saw it and it did not disappoint!  I enjoyed working with the fun and gender-neutral colors and prints and I know you will too.   I could absolutely make a gift or card out of this collection and give it to just about anyone of any age.  This collection is great for making a stash of quick and easy birthday cards to have on hand! I know sometimes I am scrambling for cards at the last minute!


For the birthday boy!  Using the Elements Sticker Sheet from the collection made making the cards a breeze!
 
 
Look at the cute hot air balloon sticker!  And the blue starburst paper I used on this card is one of my favorites in the collection! Gorgeous!
 
 
There is so many fun colors in this collection, I easily made cards for boys and girls! On this one, I embossed one of the solid papers.  I love the thickness of Carta Bella's papers too!  Great for all kinds of projects and gifts!
 
Thanks so much for stopping in today!  I really appreciate it! 
Have a happy day everyone!
Tegan


Tuesday, February 4, 2014

Valentine's Inspired Layout!

Good day everyone!  Today I am sharing my Valentine's inspired layout using a non-Valentine's collection.  It was so easy to do... I just pulled out the neutral colors of cream and black.  And then I pulled out all of the pinks, reds, and teals of the collection too!  I used Pink Paislee's Hey Kid and Sentiment Series- and they worked really well on this Valentine's inspired layout about my pooch! 


I love the vellum banners like the ones shown here... They add just the right amount of interest to the page!  The other pieces are from the ephemera pack.


I placed one picture away from the group of photos for something just a little bit different.  I like the way it turned out!  
 
And I hope I have inspired you to look through your non-themed collections for products that can be used on a Valentine's layout!  As always, thanks for dropping in and have a great day!
Hugs, Tegan


Tuesday, January 28, 2014

Making a bold design on a layout

Good morning everyone!  Today I am excited to be sharing my very first layout for Pink Paislee as a member of their creative team!  Today post is all about making my favorite paper patterns a major focal point while not overshadowing the photos.  I used Pink Paislee's Hey Kid collection and I just love the bright colors and fun graphics!  Perfect for the design I had in mind! 


Hop on over to Pink Paislee to see how I created this fun and bold design!

I love using a bold page design like this to feature my favorite patterned papers.  Sometimes I find myself hoarding my favorite patterns and they never get used.  With this technique I will be sure to use more of my favorites!
And here are some close ups!


Thanks for stopping in!  I hope I have inspired you to use those favorite patterned papers and not stash them away!   Have a great day all!
Hugs, Tegan


Wednesday, January 15, 2014

A layout with a fun design!

Good day everyone!  Today I am showing off a layout featuring The Paper Bakery's December scrapbook kit called Times Square. You will definitely love it as much as I do!  It is filled with versatile papers and embellishments that can be used for any topic!  This layout is close to my heart because it shows off a few pics of my dad and I.  And unfortunately dad doesn't get scrapped a lot so I was happy to scrap this page!


I used the Jillibean Soup flashcards that were included the kit as inspiration for my design.  I used the cards to make all of my pieces the same shape.  I then constructed a design using those shapes and the panels of wood on the patterned paper.


I fussy cut out the title from the Studio Calico paper that was included in the kit as well.  I know some people aren't fond of fussy cutting, but this title was SO worth it!

I even typed my journaling on the computer and modeled it after the Jillibean Soup flashcards!

Thanks for stopping in today!  I hope everyone is staying warm and enjoying some scrapbooking time!   You can check out Paper Bakery's December kit here!   You will love the cork pieces and the chipboard that is included, just to name a few!  Have a great day!
Hugs, Tegan


Friday, January 10, 2014

Homemade with Love banner!


Hello! Today I am sharing a fun and easy banner I made with the oh-so-delicious Homemade with Love collection by Carta Bella.  I adore the color palette- red, teal, yellow, and pink! This collection is great for layouts of baking with family, cards, and home decor projects as well!  I easily used this line to create a food-inspired banner for my kitchen. Today I am sharing how you too can make a similar banner!  You can't go wrong with cute little element stickers such as utensils and pies! Yum!
 
 
And some yummy close ups!


This is how you too can make your very own banner:
1.  Cut the banner bases out of "Baking Stripe" and "Must Bake" papers.  To make the banners, I first cut the papers into tall rectangles.  I marked the exact middle on the bottom of each paper.  I then cut off a wedge shape from that middle mark to about one inch up one side of the rectangle.  I then did the exact thing on the opposite side so that both sides matched.
2. Cut slightly smaller banners from the "Kitchen Corner" paper and adhere in middle of banners.
3. Again cut even slightly smaller banners from the back sides of the "Baking Border Strips" and "Recipe Cards" papers and adhere them to middle of banners.
4. Die cut scalloped circles from the "Grandma's Recipes", "Mixing Bowls", and "Must Bake" papers.  I used a Spellbinders die.  Use a standard size coffee mug and pencil to trace a circle in the middle of each scalloped circle.  Use a thin marker to make stitch marks over the pencil lines.  Make sure marker is dry and erase pencil lines. Use foam adhesive to adhere each of these circles to a banner piece.
5. Decorate each scalloped circle as shown using the "Element Stickers", buttons, and foam adhesive.  Use a punch to make the scalloped borders and attach to the top of each banner piece.
6.  Make 4 small bows from May Arts' thin chevron ribbon and adhere them to the corners of the banner.  Adhere small red buttons to the middle of the bows.  Adhere a piece of ribbon to each side of banner for hanging.
Thanks for joining us today!  I hope I have inspired you to make your own banner and not just made you hungry for pie!
Hugs, Tegan