Saturday, January 25, 2020

Doodlebug Design Love Notes!

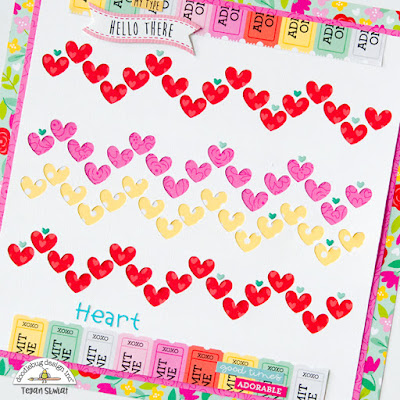
I am in love with the beautiful new Doodlebug Design Love Notes collection! The mix of colors, floral patterns, and hearts has me swooning! It was just perfect for documenting a recent picture of my sweetheart. And I had fun using a Doodlebug Design cut file to create a fun heart background!
I started by using the heart cut file (which is actually part of the Doodlebug Simply Spring Butterfly Cut File) to create my own heart chevron design. I made each heart about .75 inches tall and each row of hearts measures about 10" wide. After I used my electronic die cut machine to cut out the hearts, I backed the design with some of the more solid colored Love Notes patterned papers to make the hearts really stand out. I used the adorable little teal Lots of Love Shape Sprinkles to embellish the heart design. 
I added a strip of the rainbow ticket patterned paper to the top and bottom of the white cardstock for a fun pop of color. I embellished the top with This & That Stickers. I then embellished my photo with Odds & Ends pieces, This & That Stickers, and the super cute Doodle-Pops Love Story typewriter.  
I used the 'my' and 'SWEET' Odds & Ends pieces to start my title. I love that the Odds & Ends packs contain amazing die cut words that can be used to easily create an awesome title! I then finished the title with the Teensy Type alphabet stickers in Swimming Pool. An adorable Doodle-Pops bird sits at the bottom of the page.
I hope I have inspired you to grab the Love Notes collection and create a fun heart background on your next layout! If you don't have an electronic die cut machine, a heart shaped paper punch would work well too!
Thanks for stopping in! Hope you have an amazing day! 


  Doodlebug Products Used:
Love Notes Collection


Mixing and Matching Bella Blvd collections!

This week's mission to create a layout with 2 or more Bella Blvd collections was a piece of cake because they all mix and match so easily! I starting by grabbing a large stack of different collections and then sorted through them for winter or non-themed items. It was actually fun...kind of like a treasure hunt! I think I ended up using 6 collections (7 if you end up counting the Acrylic Word from the Bug Explorer collection)! Do you spy a little bit of Santa Squad, Let's Go On An Adventure, Wish Big Girl, Santa Stops Here, Squeeze the Day, or the Merry Christmas collection?! 
I started by using the Bella Blvd Snowflake Cut File and electronic die cut machine to cut five 3" tall snowflakes out of white cardstock. I then backed them with different colors of patterned paper. I had pulled out a combination of Acrylic Words and die cut pieces that could be used to describe winter, so I adhered those to the different snowflakes. 
I embellished the snowflakes with enamel dots from the Heart Hugs packs and Christmas Mix Enamel Dots from the Santa Squad collections. I really wanted to mix and match the colors to create a colorful layout and stay away from a Christmas vibe! 
The penguin Santa Squad Epoxy Sticker was perfect for adding a touch of winter. I also added Word Salad stickers around the page on different snowflakes to add color around the page. And of course I used Word Salad stickers that could be used to describe winter!
I had so much fun mixing and matching the collections to create a fun and colorful winter layout! I can't decide which snowflake is my favorite, can you?


Friday, January 17, 2020

All Yeti For Winter!

I can't get enough of the fun Doodlebug Design Winter Wonderland collection! The colors are so pretty and the animals, yeti, and snowmen (and snowwomen!) in this collection are just adorable. This collection is great for documenting all kinds of winter activities like our snowy walk through the woods last year. 

I started the layout by using strips of the Doodlebug Design Polar Polka Dots Washi Tape to create a fun vertical background design.  I really wanted Harry the Yeti DoodlePop to stand out on this layout so I featured him on the title.  I added Harry to the 'All Yeti For Winter' This & That Sticker piece and then gave him some Icons Sticker mittens and a birdy on his head. I then layered a couple Icons Sticker 'friends' behind him. I love how this title turned out!

I wanted to loosely base my design on making it look like snowflakes were 'falling' down on my photos and cabin design at the bottom of the page. The Snowflakes Odds & Ends pieces were perfect for helping me achieve this look! I then used the Doodlebug Design Polar Pals Snowflake cut file to cut out a few smaller snowflake shapes to layer over them. I embellished the flakes with Doodlebug Design Jewels in Swimming Pool.

I love piecing together little scenes using the Odds & Ends pieces! Here I layered the Icons Sticker snowman, skis, and bunny over the cabin Odds & Ends piece. I also added a couple of the adorable Snow Family Sprinkles to this fun winter scene! 
Thanks for joining me today! I hope I have I inspired you to grab some of the super fun Winter Wonderland collection (and Harry) for your next layout! Are you 'yeti' for Winter?! 

Doodlebug Design Supplies
Winter Wonderland Collection
Polar Polka Dots Washi Tape
Polar Pals Snowflake Cut File


Thursday, January 2, 2020

Fun with new Bella Blvd Cut-Outs!

If you don't have an electronic die cut machine, you can still join in the paper piecing fun with the brand new Bella Blvd Cut-Outs! The Cut-Outs are large shapes and phrases precut out of white cardstock and are ready to be decorated by you with your favorite patterned papers. On today's layout, I combined the 'Santa's Little Helper' Cut-Outs phrase with the adorable Santa Squad collection!
I used the snowflake print Blizzard patterned paper to back the entire phrase to really make it pop against my multicolor background. I then embellished parts of the layout with Ephemera Icons die cuts, Chipboard Shapes, and Snow Fun epoxy snowflake shapes. 
I used this loopy section at the top to 'hang' a couple of the darling Gingerbread Acrylic Shapes on. Aren't they just the cutest?! I embellished this section with some Puffy Stars and Enamel Heart Shapes.
Here I cut the presents (which I can use on a different layout!) off of the phrase so I could add a second photograph. I embellished this picture with more super cute Ephemera Icons shapes and a snowflake epoxy piece. 
And of course we couldn't leave Santa out! Here I embellished the Chipboard Santa piece with Ephemera Icons gift shapes, Puffy Stars, and Snowflake Epoxy Shapes. Looks like Santa is ready to deliver his presents now! 
Thanks for stopping in today! Do you have some of your own Santa's Little Helpers to document? I hope I have inspired you to grab some of the new Bella Blvd Cut-Outs and the Santa Squad collection!


Snow Fun with Doodlebug Design!

Who else is in love with the brand new Winter Wonderland collection?! I am swooning over the color palette and the adorable critter images! And it is perfect for documenting all kinds of cold weather activities like our winter walk in the woods last year!

I started out by using the pink Winter Wonderland patterned paper as my background and adhered a 4 inch strip of the aqua floral Nightfall patterned paper across the middle of it. I then used my electronic die cut machine and the Doodlebug Design Snowflake cut file to cut a large snowflake out of white cardstock. I cut this snowflake in half horizontally and attached the top half above the floral strip of paper and then the bottom half below the floral paper strip. 

There are SO MANY adorable graphics in this collection, I had a hard time deciding which Odds & Ends die cuts to use! I finally decided to go with the fun purple mountains layered underneath the 'Snow Fun' sentiment and the super cute artic fox. The Odds & Ends Snowflakes pack was great for adding a flurry of acetate and paper snowflakes around the page. 

And isn't this yeti Odds & End die cut just the cutest?!? I added a little snowflake die cut in his hand and gave him a little pink sticker heart. I embellished the tree die cut with Heart Shape Sprinkles. I then added the fun banner die cut underneath the yeti and embellished it with more Heart Shape Sprinkles. 

Thank you so much for joining me today! I hope I have inspired you to take some fun snow pictures and document them with the adorable Winter Wonderland collection!

Doodlebug Design Products Used
Winter Wonderland Collection


So Sweet Layout with Bella Blvd!

I can't get enough of the Squeeze the Day collection! The rainbow of colors and fruity graphics are perfect for documenting so many different subjects! The fruit icons are super cute for this page about my sweet Cairn Terrier Pixie! 
Of course I had to top the layout with my favorite patterned paper from the collection, which is the striped side of the Bananas For You paper. I also love the addition of black in this collection. And the Ephemera Icons, Doohickey Stickers, Enamel Stickers, and Epoxy Stickers are so fun!
I layered some more of my favorite patterned papers from the collection to anchor my photo on. I then embellished this section with more Ephemera Icon shapes, Doohickey Stickers, and Enamel Shapes. I added a little embroidery floss to the pineapple die cut piece for a little fun added texture.
For a super fun title design, I used the Bella Blvd Watermelon Cut File, Bella Besties Patterned Paper, and the So Sweet Acrylic Words piece. I added a little coordinating pink embroidery floss to the watermelon to make it stand out a little more. Isn't it just SO SWEET (pun intended!)?
Thanks for stopping in today! I hope I have inspired you to grab some of the fun and fruity Squeeze the Day collection and document a sweet photo of your own!