Thursday, January 28, 2016

Blowing Kisses layout

 Good day everyone! Here I used the Echo Park Blowing Kisses collection, and the color palette of this LOVELY collection (pun intended!) has me swooning! I love the addition of the black along with the reds and pinks. And I am in love with the hearts, doilies, and roses!

I started by trimming the solid cream paper from the collection to 8 1/2” x 11”. At the top of my layout, I simply layered strips of the solid black and red/white stripe patterned papers. And then added the round ephemera bit and a button from my supplies.

Tip: Add a little bit of vellum for a fun effect on layouts! Here I added a strip of it on the left side of the pink doily patterned paper. I love how it adds just a little something extra! I added layers of cute coordinating stickers and ephemera bits too.

I absolutely adore this couples silhouette from the sticker sheet! I used the “Love” die from the Silhouette Love Die set to cut out “Love” using vellum and added it over the couple. I think it adds a sweet touch!

The cute pink alphabet stickers are perfect for titles like the one I made here. And I seriously can’t get enough of the banner stickers. They quickly and cutely finish off the bottom of my layout!

These flower stickers are adorable too. I could have an entire garden full of them! Thanks for joining me today! I hope I have inspired you to create a layout about someone or something you love!


Thursday, January 21, 2016

Bella Blvd Product Spotlight for Paper Issues

It's time for another Product Spotlight over at the Paper Issues blog! This Spotlight is on anything Bella Blvd and I chose the yummy and lovely Valentina collection. It has a great mix of reds and pinks with a little black and white added in. And it just screams LOVE to me! You can find Valentina in the Paper Issues store here. And you can use the code Tegan for 20% off your order! 

I used different patterned paper and fun shapes from the coordinating Valentina sticker sheet to design this layout. I added a few splashes of opaque white mist to finish it off.

I adore the alphabet from the sticker sheet too! It is so fun and whimsical!

Thanks for joining me today! And please remember to use the code Tegan to get 20% off your order in the Paper Issues store!! 


Sunday, January 3, 2016

A DIY Party Hat!


Hello! Today's post is all about a fun little DIY party hat I made using Echo Park Paper's Little Man collection! The color palette of this bright collection is perfect for layouts, cards, or any kind of project about young, energetic boys!  I first used my Silhouette Cameo to cut out a basic 3D party hat shape from teal star patterned paper. And embellishing my hat was a snap using this happy-go-lucky collection!

I die cut the solid blue star and the orange patterned star using dies from the Dream Big Die Set. I adhered these cut stars to the top of the hat using foam adhesive. I then adhered a green star sticker to a tooth pick and stuck the bottom of the tooth pick into the foam adhesive behind the orange star. I then adhered the red banner sticker to the very top. So easy, but oh-so-cute!

I first embellished the bottom half of the hat by adhering the bulls eye die cut from the Ephemera Pack. I used foam adhesive to adhere the "boys rule" sticker in the middle of the bulls eye. I then added two little red banners and star stickers.

Next, I adhered the little boy sticker to the hat with more foam adhesive and added a green star sticker to his shirt. I love how this sticker shows him in the middle of skate boarding! How cool!
Thanks for joining me today! I hope I have inspired you to create a fun party hat when you get your hands on this fun Little Man collection!


Monday, December 7, 2015

A Doggone Cute Mini Album!


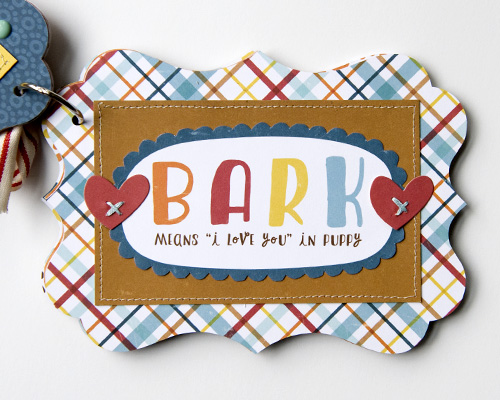
Fur kids are family too, right?! The Bark collection is great for documenting furry family members because it is colorful and fun! I began this mini album by first die cutting all of the pages out of different patterned papers using an Echo Park label cut file from the Silhouette Design store. This is definitely my new favorite way to make mini albums! It is so easy!  I embellished my mini album cover with the doghouse and banner stickers. And then I die cut a cute little pooch from the Dog Bark Die Set. Isn't he just adorable?!?


The mix of patterns is this collection is fabulous! It includes everything from a fun multi-color plaid to a great dog print! I also cut a few hearts from the Puppy Love Die Set and embellished them with a little embroidery floss for dimension.


I love the paw print patterned papers too! And how fun is that little fire hydrant sticker embellished with a little red button! I machine stitched around the pages of each of my pages. But if you don't sew, you can get a similar look by drawing in little dashed lines with a thin tipped marker.


I die cut "bark, bark" from the Dog Bark Die Set to create a bold page design and added another die cut heart. And I could not forget about the cute stamp set that coordinates with the Bark collection! It includes lots of great images- including this cute pooch!


I then trimmed the dog emblem from patterned paper and embellished it with a red stamped banner. To finish my album, I cut a phrase from patterned paper and adhered it next to a sweet little dog sticker. So easy and so cute! The multi-colored paw print background is one of my new favorite patterned papers! Thanks for letting me share my mini album and my fur kid with all of you! 


Monday, November 16, 2015

Die Cut Snowman Cards!


I am in love with the Echo Park Hello Winter collection! I love the colors in the collection and the snowman from the coordinating die and stamp set just melts my heart. Here is how I easily made these fun cards!

 
I stamped the main sentiment onto cardstock using black ink.
 
 
I stamped the edges with snowflakes using Hero Arts Soft Pool ink.
 
 
I die cut and stamped these cute little guys!
 
 
And then I added my stamped card and snowman to my cards and embellished! So easy!
 
 
Thanks for joining me! Have a great day!


Thursday, November 5, 2015

DIY embellishments with Echo Park Designer Dies!

Hello!  Tegan here today sharing my latest layout I designed using the cool (pun intended!) new Hello Winter Collection.  I am in love with the color palette- the mix of light blues, aqua, navy, and gray is perfect for winter projects. This whimsical collection is great for documenting playing in the snow! And the coordinating die sets helped me create this fun layout rather quickly. I used pieces from my two favorite die sets of this release which are the Hello Winter Die Set and the Winter Animals Die Set. First I used the pine tree from the Hello Winter Die Set to create a set of fun embellishments for my page.


1. Trim three 2 1/4" x 2 1/2" rectangles from grey polka dot patterned paper.
 
 
2. Die cut pine trees from middle of all three rectangles. I adhered the die to the back of rectangles using decorative tape to hold it in place while cutting.
 
 
3. Draw borders onto rectangles using thin black marker.
 
 
4. Back die cut rectangles with dark gray and navy patterned papers using foam adhesive. Thread small aqua buttons with embroidery floss and adhere to top of trees. So easy and so cute!


I used the Winter Animals Die Set to make this little penguin guy. He seriously has to be the cutest little thing ever! I used foam adhesive to adhere the cream layer onto the black layer to give him a three dimensional effect. I can see this little cutie on everything! He's going to be on my winter mini album, my Christmas gift tags, and some cards! And I used the swirling steam die from the Hello Winter Die Set to make the wind swirls behind Mr. Penguin. I love dies that can be used as multiple things!
Thanks for joining us today! I hope I have inspired you to use lots of die cuts on your next layout or project!


Tuesday, November 3, 2015

This Mini Album is All About Family

Looking for a paper collection that is perfect for documenting your family? Echo Park Paper's The Story of Us is it! I love the eclectic color palette of yellow, aqua, rust, salmon, and navy! And how stinkin' adorable is that little chipboard house? I used the "Family is Forever" die cut from the ephemera pack as the main design element on the cover.

 I made my pages by using my Silhouette Cameo to cut this label shape from patterned paper. I used the middle label from Echo Park's label set in the Silhouette store.


I am head over heels in love with this chipboard arrow! Love!


The decorative telephone brad is super cute too!


I used the coordinating The Story of Us chipboard stickers, decorative tape, brads, and enamel dots to easily embellish my album.
I hope I have inspired you to document your family, even if it's only random pictures like I did here.
Thanks for stopping in today!